Ein Brand Profile bündelt wiederkehrende Markenwerte für kompatible Newsletter-Vorlagen. Dazu gehören unter anderem Logo, Farben, websichere Schriften, Abstände, Rundungen, Unternehmensangaben, Social-Media-Profile und Impressum. Beim Anwenden kopiert mailfino diese Werte in den aktuellen Entwurf; danach bleiben sie normal bearbeitbar.
Voraussetzungen und Rechte
Brand Profiles verwenden zwei getrennte Berechtigungen:
Brand Profiles verwenden erlaubt, verfügbare Profile auf kompatible Newsletter anzuwenden.
Brand Profiles erstellen erlaubt zusätzlich, eigene Profile anzulegen und zu pflegen.
Je nach Rolle kannst Du Profile daher nur auswählen und ansehen, aber nicht ändern oder löschen. Administratorprofile können kontenübergreifend zur Verwendung bereitgestellt werden. Wenn Dir ein benötigter Menüpunkt oder die Schaltfläche Neues Profil fehlt, wende Dich an die Kontoverwaltung.
Profil aus einer Website erstellen
Öffne im Zahnradmenü Brand Profiles and choose Neues Profil. Der Assistent beginnt mit der öffentlichen Website Deiner Organisation.
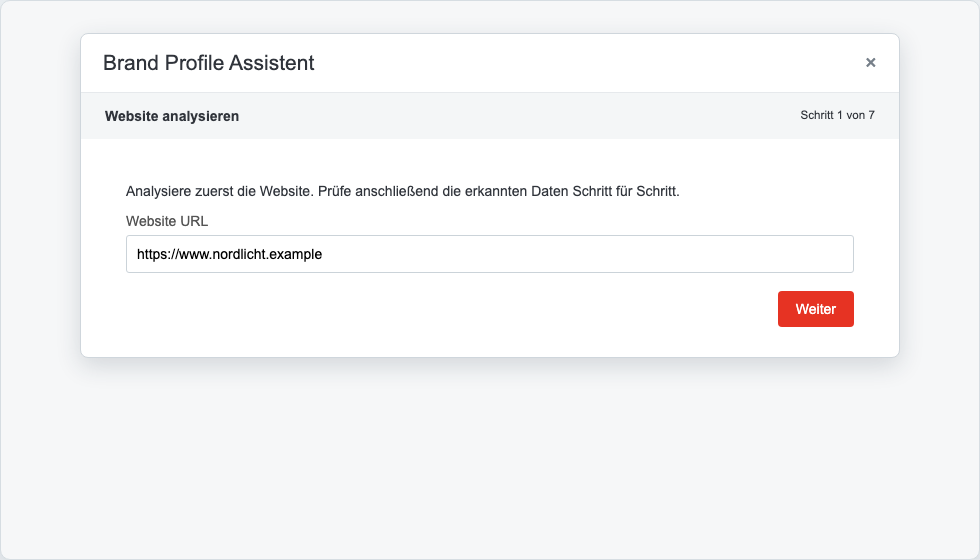
Trage eine vollständige Website-URL wie https://www.beispiel.de ein.
Select Next. Dadurch startet die Website-Analyse.
Nach erfolgreicher Analyse wechselt der Assistent direkt zu Schritt 2 mit den erkannten Impressumsangaben.
Erster Schritt des Brand-Profile-Assistenten mit Website-URL und der Schaltfläche „Weiter“
Die Analyse versucht, sichtbare Marken- und Unternehmensdaten zu erkennen. Sie ist ein Vorschlag, keine rechtliche oder gestalterische Freigabe. Verwende nur Websites und Markenwerte, die Du nutzen darfst. Ist für dieselbe Website bereits ein Profil vorhanden, verhindert mailfino eine unbeabsichtigte Dublette.
Erkannte Daten Schritt für Schritt prüfen
Der Assistent führt durch sieben Schritte. Kontrolliere jede Seite und korrigiere Werte direkt, bevor Du weitergehst.
1. Website und Analyse
Prüfe, ob die URL zur richtigen Organisation und Sprachversion führt. Eine öffentlich erreichbare, aktuelle Startseite liefert in der Regel bessere Ergebnisse als eine Unterseite ohne Logo oder Unternehmensdaten.
2. Impressumsangaben
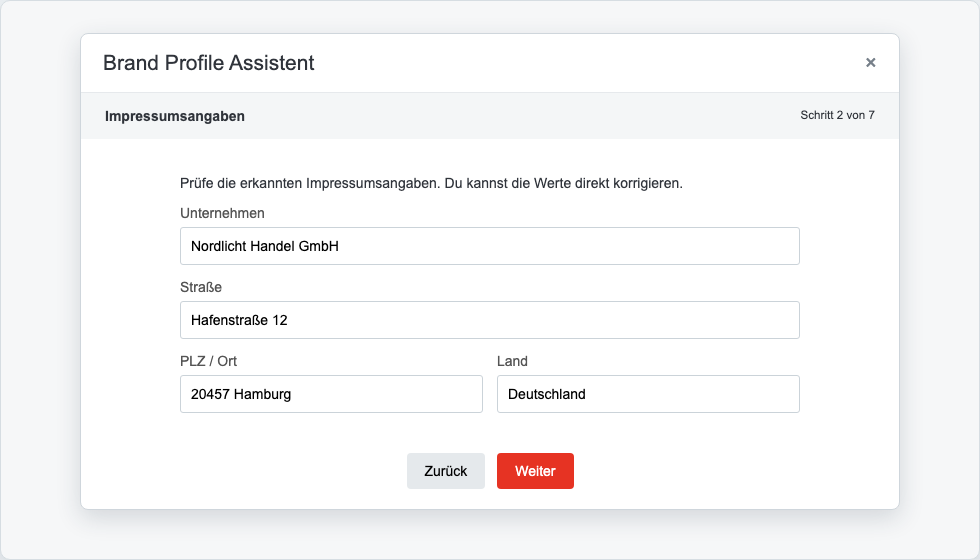
Kontrolliere Unternehmensname, Straße, Postleitzahl, Ort und Land. Übernimm die Angaben nicht ungeprüft: Für den Versand ist der Absender für ein vollständiges, aktuelles Impressum verantwortlich.
Schritt 2 des Brand-Profile-Assistenten mit getrennten Impressumsfeldern
3. Impressumstext
Prüfe den vollständigen Text einschließlich Rechtsform, Vertretungsberechtigten und weiterer erforderlicher Angaben. Der Editor im Assistenten erlaubt grundlegende Formatierungen und Links.
4. Logo
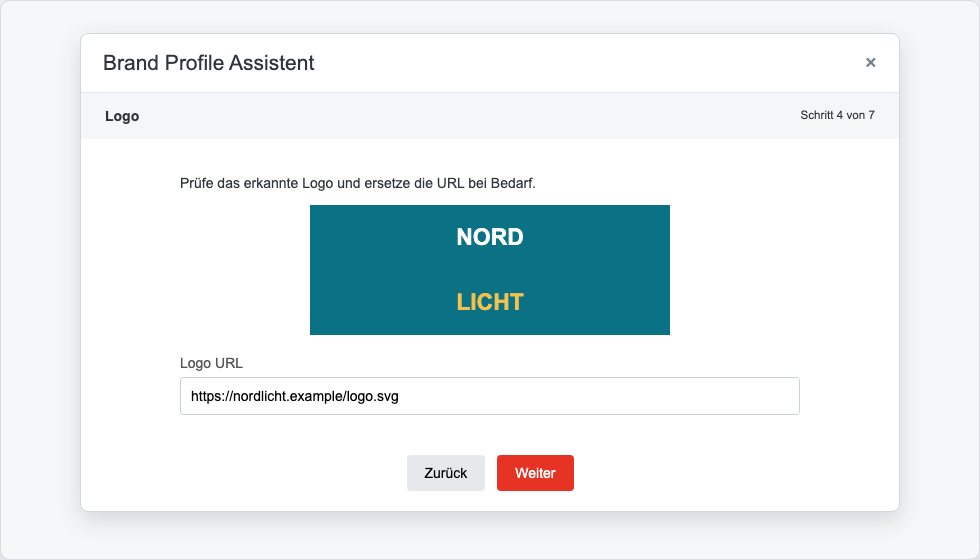
Prüfe Logo-URL und Vorschau. Verwende eine Variante, die auf dem vorgesehenen Hintergrund gut lesbar ist. Beim Speichern werden erkannte Bildressourcen in den Bildbereich des Kontos kopiert, damit der Newsletter nicht dauerhaft von der untersuchten Website abhängt.
Schritt 4 des Brand-Profile-Assistenten mit Logo-Vorschau und Logo-URL
5. Farben
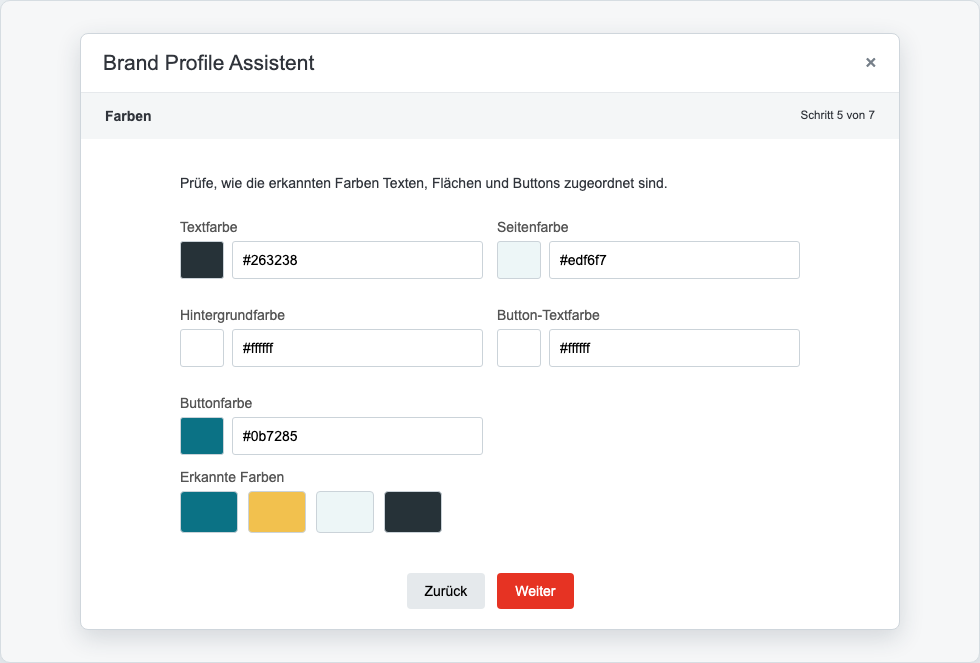
Kontrolliere Textfarbe, Seitenfarbe, Hintergrundfarbe, Button-Textfarbe, Buttonfarbe und die erkannte Palette. Wähle Farben nicht nur nach Markentreue: Text und Schaltflächen benötigen ausreichend Kontrast; Seiten- und Inhaltshintergrund müssen außerdem klar unterscheidbar bleiben.
Schritt 5 des Brand-Profile-Assistenten mit den tatsächlich zugeordneten Text-, Flächen- und Buttonfarben
6. Schrift und Favicon
Ordne eine websichere Schrift zu und prüfe die erkannte Schrift sowie das Favicon. Eine erkannte Webschrift wird nicht automatisch in jedem E-Mail-Programm verfügbar; die websichere Schrift ist deshalb die verlässliche Grundlage.
7. Speichern
Vergib einen eindeutigen Profilnamen und kontrolliere die Zusammenfassung. Ein Name kann nicht doppelt verwendet werden, ohne dass mailfino eine Überschreibentscheidung verlangt.
Gespeicherte Profile verwalten
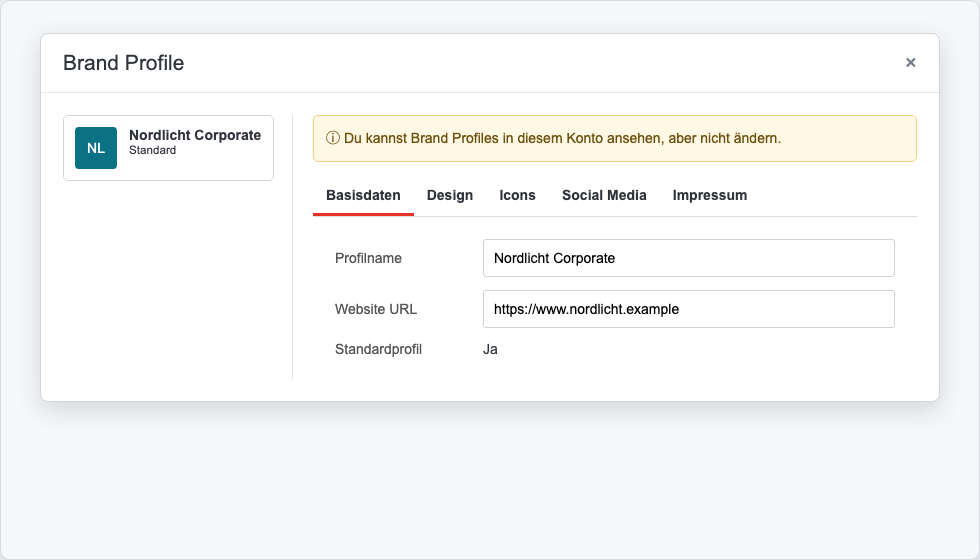
Open Brand Profiles, um vorhandene Profile auszuwählen. Die Verwaltungsansicht gliedert die Daten in Basisdaten, Design, Icons, Social Media or Imprint. Je nach Berechtigung kannst Du:
Namen, Website und Unternehmensdaten bearbeiten,
Farben, Schriften, Abstände, Rundungen und Schatten anpassen,
Logo und Favicon prüfen,
erkannte Social-Media-Profile kontrollieren,
Impressumstext bearbeiten,
ein eigenes Profil als Standard festlegen,
eigene Profile löschen.
Brand-Profile-Verwaltung mit Profil, Bereichen und Hinweis auf Leserechte
Der gelbe Hinweis in der Verwaltung kennzeichnet einen Nur-Lese-Zugriff. Die Felder können in der aktuellen Oberfläche weiterhin bearbeitbar erscheinen; der Server verweigert jedoch das Speichern solcher Änderungen. Ein freigegebenes Administratorprofil kannst Du verwenden, aber nicht dauerhaft verändern oder löschen. Änderungen an einem gespeicherten Profil wirken sich nicht rückwirkend auf Newsletter aus, auf die es bereits angewendet wurde.
Brand Profile auf einen Newsletter anwenden
Brand Profiles funktionieren nur mit Vorlagen, die ausdrücklich dafür vorbereitet sind. So wendest Du ein Profil an:
Öffne eine kompatible System- oder eigene Vorlage.
Klicke außerhalb einzelner Bausteine auf das Newsletter-Layout, damit die Layout-Eigenschaften sichtbar sind.
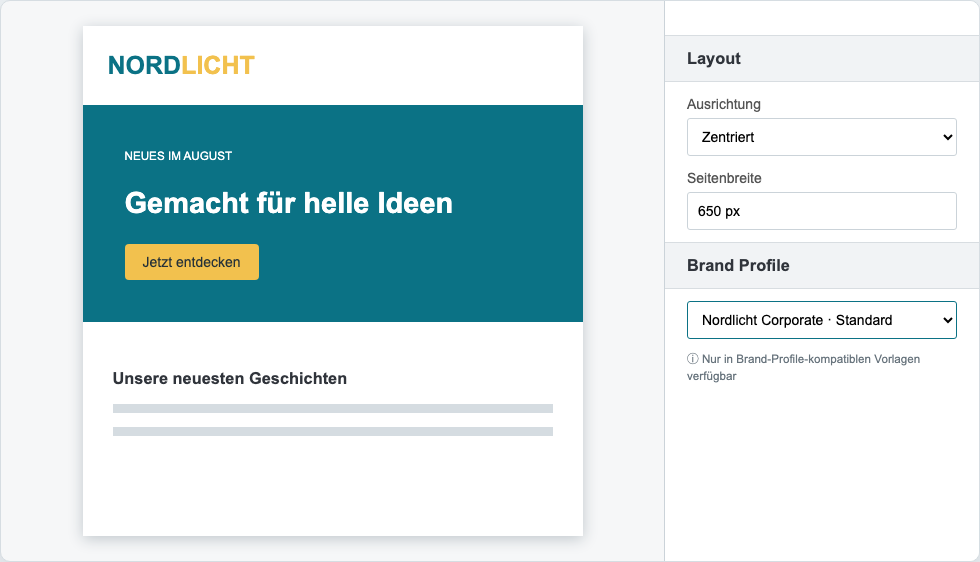
Öffne im Eigenschaftenbereich Brand Profile.
Wähle das gewünschte Profil aus der Liste.
Prüfe den Newsletter vollständig und speichere ihn als Entwurf.
Brand-Profile-Auswahl in den Layout-Eigenschaften einer kompatiblen Vorlage
Wenn der Bereich Brand Profile nicht erscheint, trifft mindestens einer dieser Fälle zu:
Die geöffnete Vorlage unterstützt keine Brand Profiles.
In Deinem Konto ist kein verwendbares Profil verfügbar.
Dir fehlt die Berechtigung Brand Profiles verwenden.
Du hast einen einzelnen Baustein statt des Newsletter-Layouts ausgewählt.
Was beim Anwenden übernommen wird
Abhängig von der Vorlage können unter anderem folgende Werte übernommen werden:
Logo und Unternehmensname,
Primär-, Sekundär-, Text-, Hintergrund-, Schaltflächen- und Linkfarben,
Schrift für Fließtext und Überschriften,
Seitenbreite und Abschnittsabstände,
Rundungen von Bildern, Karten und Schaltflächen,
Kartenschatten,
Social-Media-Links,
Impressumstext.
Die konkreten Elemente hängen davon ab, welche Bereiche die Vorlage für Brand Profiles vorbereitet hat. Nicht jeder Wert muss in jeder Vorlage sichtbar sein.
Änderungen, Rückgängig und Vorlagenstandard
Die Profilwerte werden als Momentaufnahme in den Entwurf kopiert. Du kannst danach einzelne Farben, Schriften, Bilder, Abstände und Texte ändern. Undo nimmt die unmittelbare Profilzuweisung als gemeinsamen Bearbeitungsschritt zurück.
Wenn Du im Auswahlfeld wieder Vorlagenstandard wählst, wird die Profilzuordnung entfernt. Bereits kopierte und anschließend bearbeitete Werte werden dadurch nicht automatisch auf den ursprünglichen Vorlagenstand zurückgesetzt. Nutze dafür unmittelbar Undo oder lade bei Bedarf eine frühere Entwurfsversion.
Kontrolle vor dem Versand
Ist das richtige Logo scharf und auf dem Hintergrund gut lesbar?
Haben Texte, Links und Schaltflächen ausreichend Kontrast?
Sind Firmenname, Anschrift, Links und Impressum aktuell?
Führen Social-Media-Links zum richtigen Konto?
Funktionieren Desktop- und Mobilansicht?
Sieht die Testmail in den relevanten Mailprogrammen korrekt aus?
> Speichere vor einer größeren Profil- oder Designänderung mit Speichern unter eine Kopie. So kannst Du den vorherigen Stand zuverlässig vergleichen.
A Brand Profile collects recurring brand values for compatible newsletter templates. These include logos, colors, web-safe fonts, spacing, corner radii, company details, social profiles, and imprint content. When you apply a profile, mailfino copies these values into the current draft; they remain fully editable afterwards.
Requirements and permissions
Brand Profiles use two separate permissions:
Use Brand Profiles allows you to apply available profiles to compatible newsletters.
Create Brand Profiles additionally allows you to create and maintain your own profiles.
Depending on your role, you may be able to select and view profiles without changing or deleting them. Administrator profiles can be made available across accounts. If a required menu item or the New profile button is missing, contact your account administrator.
Create a profile from a website
Open Brand Profiles from the gear menu and choose New profile. The wizard starts with your organization’s public website.
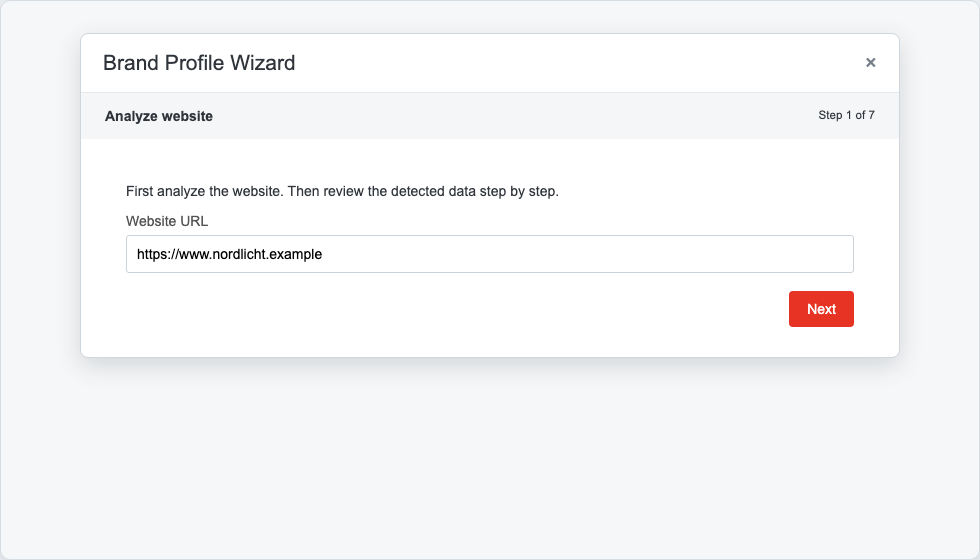
Enter a complete website URL such as https://www.example.com.
Select Next. This starts the website analysis.
After a successful analysis, the wizard proceeds directly to step 2 with the detected imprint details.
First Brand Profile wizard step with website URL and the Next button
Analysis attempts to detect visible brand and company data. It is a proposal, not legal or design approval. Use only websites and brand assets you are authorized to use. If a profile already exists for the same website, mailfino prevents an accidental duplicate.
Review detected data step by step
The wizard has seven steps. Review every page and correct values directly before continuing.
1. Website and analysis
Confirm that the URL points to the correct organization and language version. A public, current home page usually produces better results than a subpage without logos or company details.
2. Imprint details
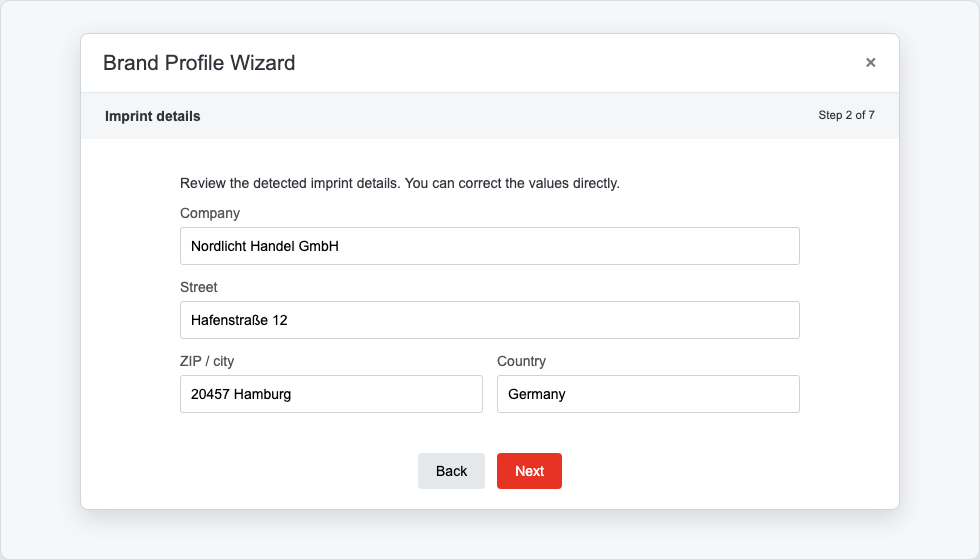
Review company name, street, postal code, city, and country. Do not accept them without checking: the sender remains responsible for complete and current imprint information.
Step 2 of the Brand Profile wizard with separate imprint fields
3. Imprint text
Review the full text, including legal form, authorized representatives, and any other required information. The wizard editor supports basic formatting and links.
4. Logo
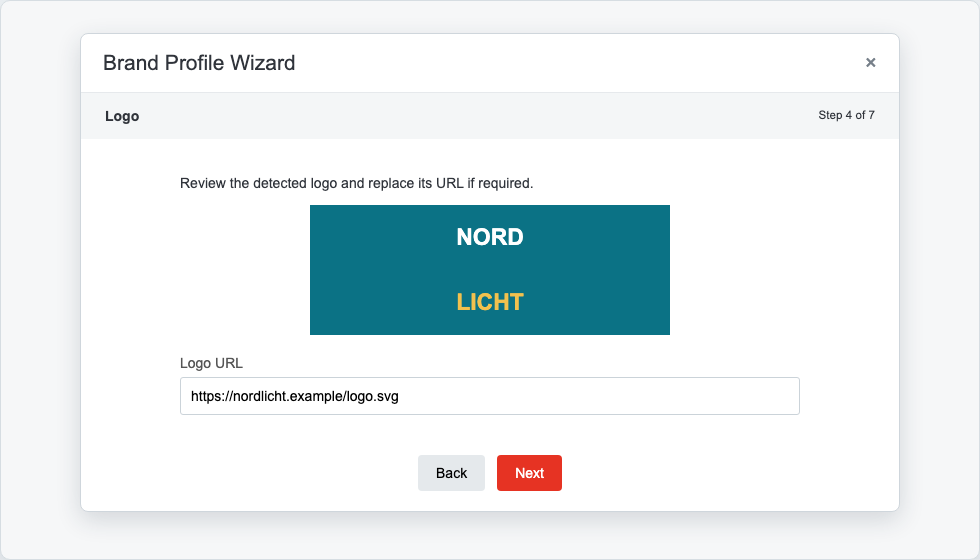
Review the logo URL and preview. Use a variant that remains legible on the intended background. When saving, detected image assets are copied into the account’s image area so the newsletter does not depend permanently on the analyzed website.
Step 4 of the Brand Profile wizard with logo preview and logo URL
5. Colors
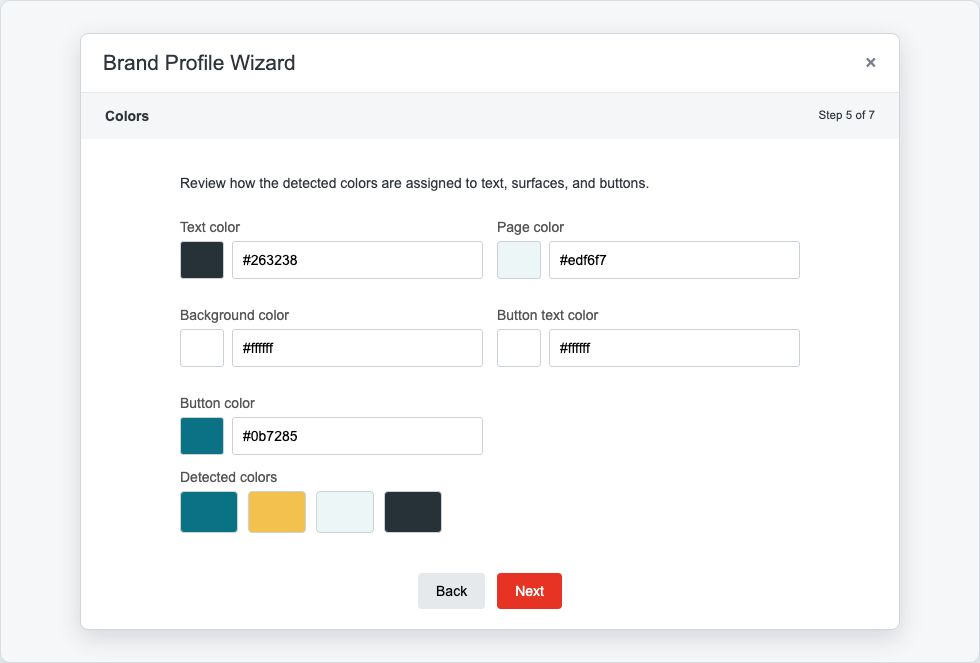
Review text color, page color, background color, button text color, button color, and the detected palette. Do not choose solely by brand accuracy: text and buttons need sufficient contrast, and page and content backgrounds must remain distinguishable.
Step 5 of the Brand Profile wizard with the actual text, surface, and button color assignments
6. Font and favicon
Select a web-safe font and review the detected font and favicon. A detected web font is not automatically available in every email client, so the web-safe font provides the reliable baseline.
7. Save
Assign a clear profile name and review the summary. A duplicate name cannot be used without mailfino asking whether to overwrite the existing profile.
Manage saved profiles
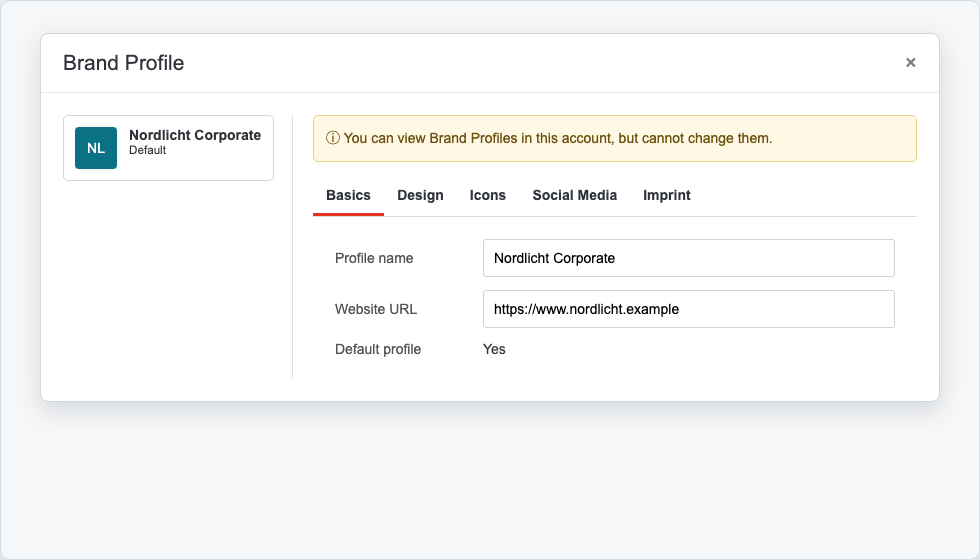
Open Brand Profiles to select an existing profile. The manager separates data into Basics, Design, Icons, Social Media, and Imprint. Depending on your permission, you can:
edit name, website, and company details;
adjust colors, fonts, spacing, corner radii, and shadows;
review logo and favicon;
check detected social profiles;
edit imprint content;
make an own profile the default;
delete own profiles.
Brand Profile manager with profile, sections, and read-only permission notice
The yellow notice in the manager indicates read-only access. Fields may still appear editable in the current interface, but the server refuses attempts to save those changes. You can use a shared administrator profile, but you cannot persist changes to it or delete it. Changes to a stored profile do not retroactively alter newsletters to which it has already been applied.
Apply a Brand Profile to a newsletter
Brand Profiles work only with templates explicitly prepared for them. To apply a profile:
Open a compatible system or own template.
Click outside individual blocks on the newsletter layout so its properties become visible.
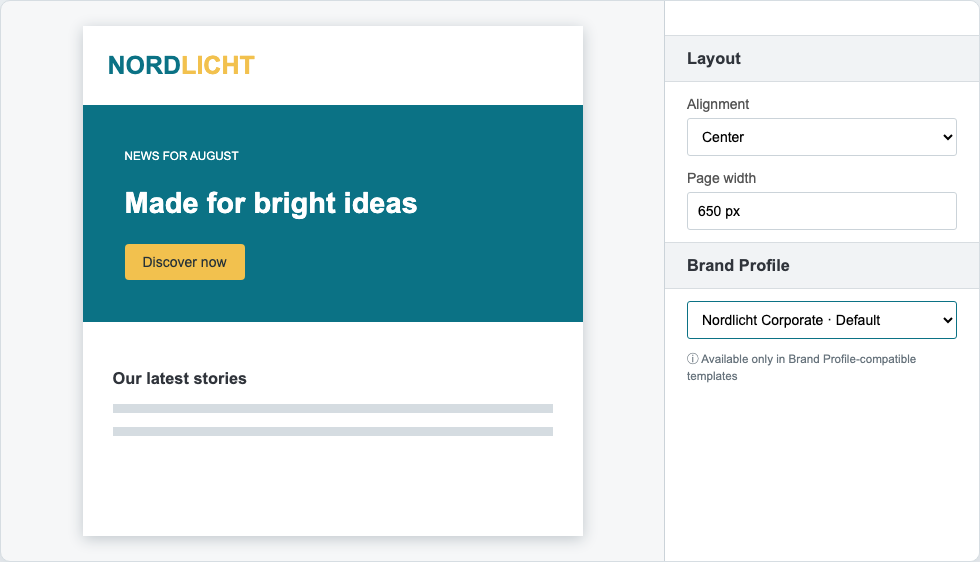
Open Brand Profile in the properties panel.
Select the required profile from the list.
Review the entire newsletter and save it as a draft.
Brand Profile selector in the layout properties of a compatible template
If the Brand Profile section does not appear, at least one of these cases applies:
The open template does not support Brand Profiles.
No usable profile is available in your account.
You do not have the Use Brand Profiles permission.
You selected an individual block instead of the newsletter layout.
Values copied when applying
Depending on the template, the following values may be copied:
logo and company name;
primary, secondary, text, background, button, and link colors;
body and heading fonts;
page width and section spacing;
image, card, and button corner radii;
card shadows;
social links;
imprint content.
The specific elements depend on the areas prepared for Brand Profiles in that template. Not every value has to be visible in every template.
Editing, Undo, and Template defaults
Profile values are copied into the draft as a snapshot. You can then change individual colors, fonts, images, spacing, and copy. Undo reverses the immediate profile assignment as one editing step.
Selecting Template defaults again removes the profile association. Values already copied and subsequently edited are not automatically restored to the original template state. Use Undo immediately or load a past draft version if required.
Checks before sending
Is the correct logo sharp and legible on its background?
Do copy, links, and buttons have sufficient contrast?
Are company name, address, links, and imprint current?
Do social links lead to the correct account?
Do desktop and mobile views work?
Does the test email render correctly in the relevant email clients?
> Before a major profile or design change, use Save as to create a copy. This gives you a reliable state for comparison.
We've detected you might be speaking a different language. Do you want to change to:

 Deutsch
  English